
Parts
HC-05 Bluetooth Serial Transceiver, you want the HC-05 that is mounted to the 6 pin breakout/interfacing board like in this picture:

HC-05 pins
See our dedicated page on the HC-05 – click here.
Configuring the HC-05
See our dedicated page on how to configure the HC-05 – click here.
Follow these steps to configure the HC-05 for wireless Arduino programming. You should see an OK response for each command.
Return the HC05 to its default manufacture settings
You need to press and hold the push button when sending this one, as it causes the HC-05 to reset and it will exit config mode as it restarts without the button held.
AT+ORGL\r\n
Set role to Slave
AT+ROLE=0\r\n
(0 = Slave, 1 = Master)
Change drive indication of LED pins
AT+POLAR=1,0\r\n
PIO8
PI08 outputs high level, PI09 (STATE pin) output low level on Bluetooth connectionconnection
Change comms settings
AT+UART=115200,0,0\r\n
Changes the baud rate to match the Arduino Uno programming setup (115200 baud, 1stop bit, no parity). N.B. this doesn’t change the baud rate for config mode, that is always 38400 baud.
Change device name from the default HC-05 (optional)
AT+NAME=NEWNAME\r\n
Change default security code from 1234 (optional)
AT+PSWD=”5678″\r\n
Initialise
AT+INIT\r\n
(We got an ERROR response for this one, don’t know why?)
Complete the config
Cycle the power to the module (without holding the button).
It will now be running at 115200 baud and be in pairing mode.
The config settings are non-volatile (they are remembered when power is lost)
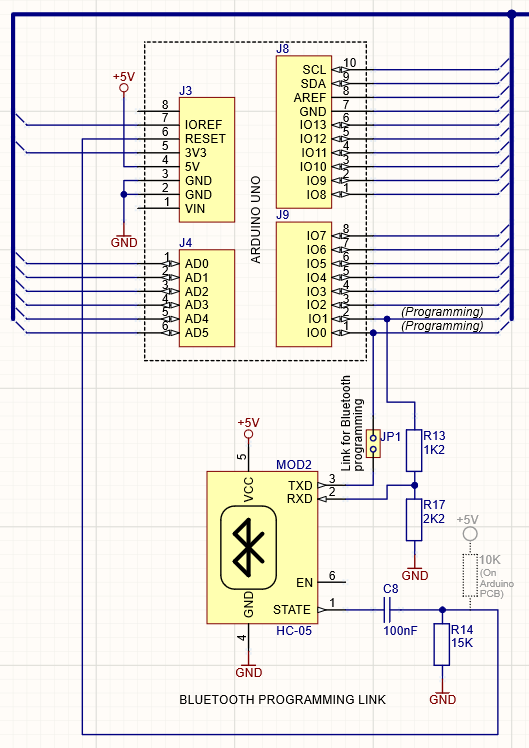
Connecting the HC-05 to your Arduino for remote programming
| Arduino | HC-05 |
| IO0 | TX (Arduino RX, HC05 TX) Can be connected directly to the Arduino Uno as it will accept 3.3V as a high level. |
| IO1 | RX (Arduino TX, HC05 RX) Connect via 1K+2K potential divider. The potential divider is required on the RX pin to shift the Arduino 5V TX pin down to 3.3V required by the HC-05 RX pin. |
| RESET | STATE, connect via a series 100nF capacitor and then add a 15K pulldown. The series capacitor is required because the STATE pin goes low for the entire time the Bluetooth connection is made, whereas the Arduino needs just a brief low pulse on its RESET pin for the bootloader to run and for it to be available to be programmed. The 15K pull down works with the 10K pull up that is on the Arduiono Uno. The HC-05 output is 3V3 which means that without the pull down added the pulse through the 100nF doesn’t go low enough to reset the Arduino’s 5V microcontroller. Using the 15K combined with the Uno’s 10K lowers the Reset pin voltage, still above the min threshold for it to run, but nearer to 0V to allow the HC-05 to successfully pulse it low via the 100nF. The reason this trick works is because the Bluetooth link is newly made each time the Arduino IDE carries out a programming operation. |
Connecting to your remote Arduino with its slave HC-05 from Windows Arduino IDE
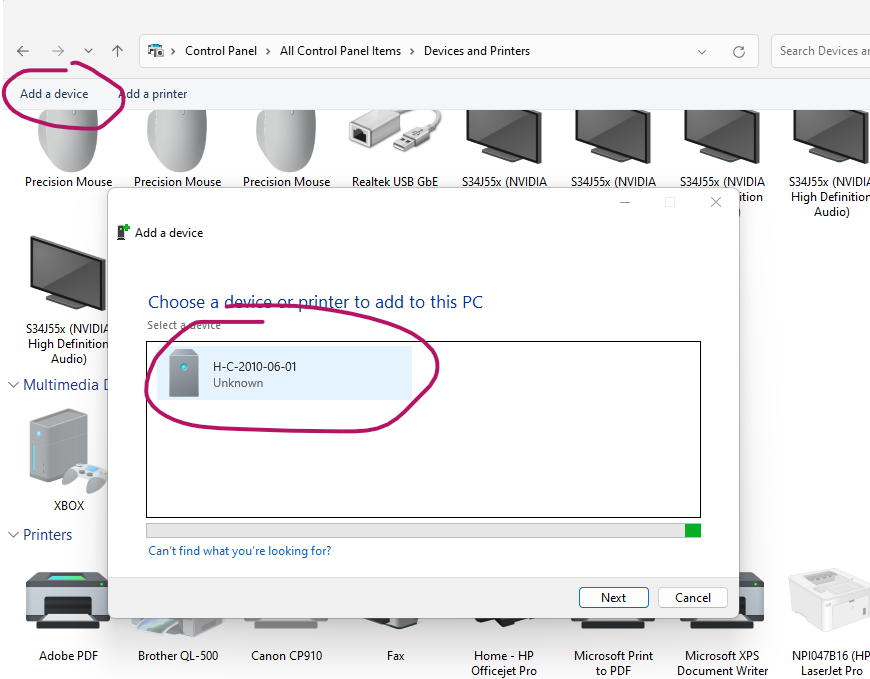
Windows Control Panel > Windows devices and printers > Add a device
When it appears select the HC-05 and connect it (its default PIN is 1234).
Note that its default name is actually incorporated with its software version, so for example our test device was named “H-C-2010-06-01” (you can set a name you choose in the steps above if you wish).
It may also be shown as “Unknown” without its proper name on the first “Add a device” screen.
That’s it, it will now appear as a serial port in Windows
Windows may add two serial ports when the device is added. To find the correct port to use, right click the HC-05 device and select Properties. Select the Hardware tab and the COM port number will be shown:
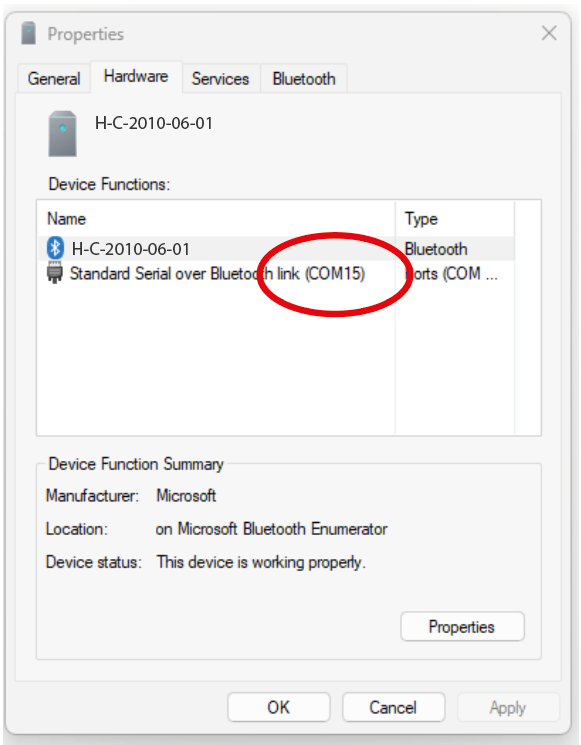
Select this COM port in the Arduino software.
Programming
You then program using the Arduino IDE as normal. You may find that programming occasionally fails and the Arduino IDE locks up in “Uploading…” state. If this happens, give it a couple of minutes to time out. It’s much better to wait on the Arduino IDE to time out than to close it and then restart it to try again, as doing this can cause the com port to become unusable. Wait a bit and let the software exit the uploading state cleanly and then try again.
Troubleshooting
Windows doesn’t find it
We found our PC running Windows 11 would not find it when adding a device from Bluetooth & devices > Devices, but would find it when using Add a device from Control Panel > Devices and Printers.
“The device stopped waiting – try adding it again”
Being quicker in our responding to the Windows prompts seemed to solve this (select it as soon as it appears and enter the PIN as soon as it asks).
There are 2 com ports created for the HC05
Right click the HC-05 device and select Properties. Select the Hardware tab and the COM port number will be shown (don’t try and program with the Arduino IDE set to the other COM port number, it seems to lock up the Arduino software).
Arduino IDE locks up in “Uploading…” state
As mentioned above give it a couple of minutes to time out. It’s usually much better to wait on the Arduino IDE to time out than to close it and then restart it to try again, as this can cause the com port to become unusable. Wait a bit and let the software exit the uploading state cleanly and then try again.
If you Windows added 2 com ports for your HC05 and you’ve selected the wrong one, then you may need to close the Arduino IDE to be able to try again with the other COM port as in our experience it can get stuck in the Uploading state forever in this case. Give it a couple of minutes first though just in case.
We have found that Windows can be a little bit flaky at times, but in general programming over the Bluetooth link will work on retrying if you’re patient. It’s frustrating because if you watch the LED on the HC05 and maybe on your project too you can tell when it’s reset to program correctly or alternatively has failed pretty much straight away and you then have to sit there waiting on the Arduino software long timeout, just have to get over it and give it its time.